DIY Tufted Headboard with Wings and Nailhead Trim!


I am so excited to have Sarah from Sarah M. Dorsey Designs here today.
After stumbling across her blog and finding her DIY headboard, I knew I wanted her to share it with you!
Sarah is crazy talented, you will love her!
Hi! I am Sarah and I blog at Sarah M. Dorsey Designs – where I focus on creative design solutions that won’t blow your budget!
First off I want to send a big thank you to Danielle for inviting me to share with you one of my latest projects!
I love the look of a tufted and winged headboard but at $500.00 and up I decided to make my own version for a lot less $$.
After developing a plan –
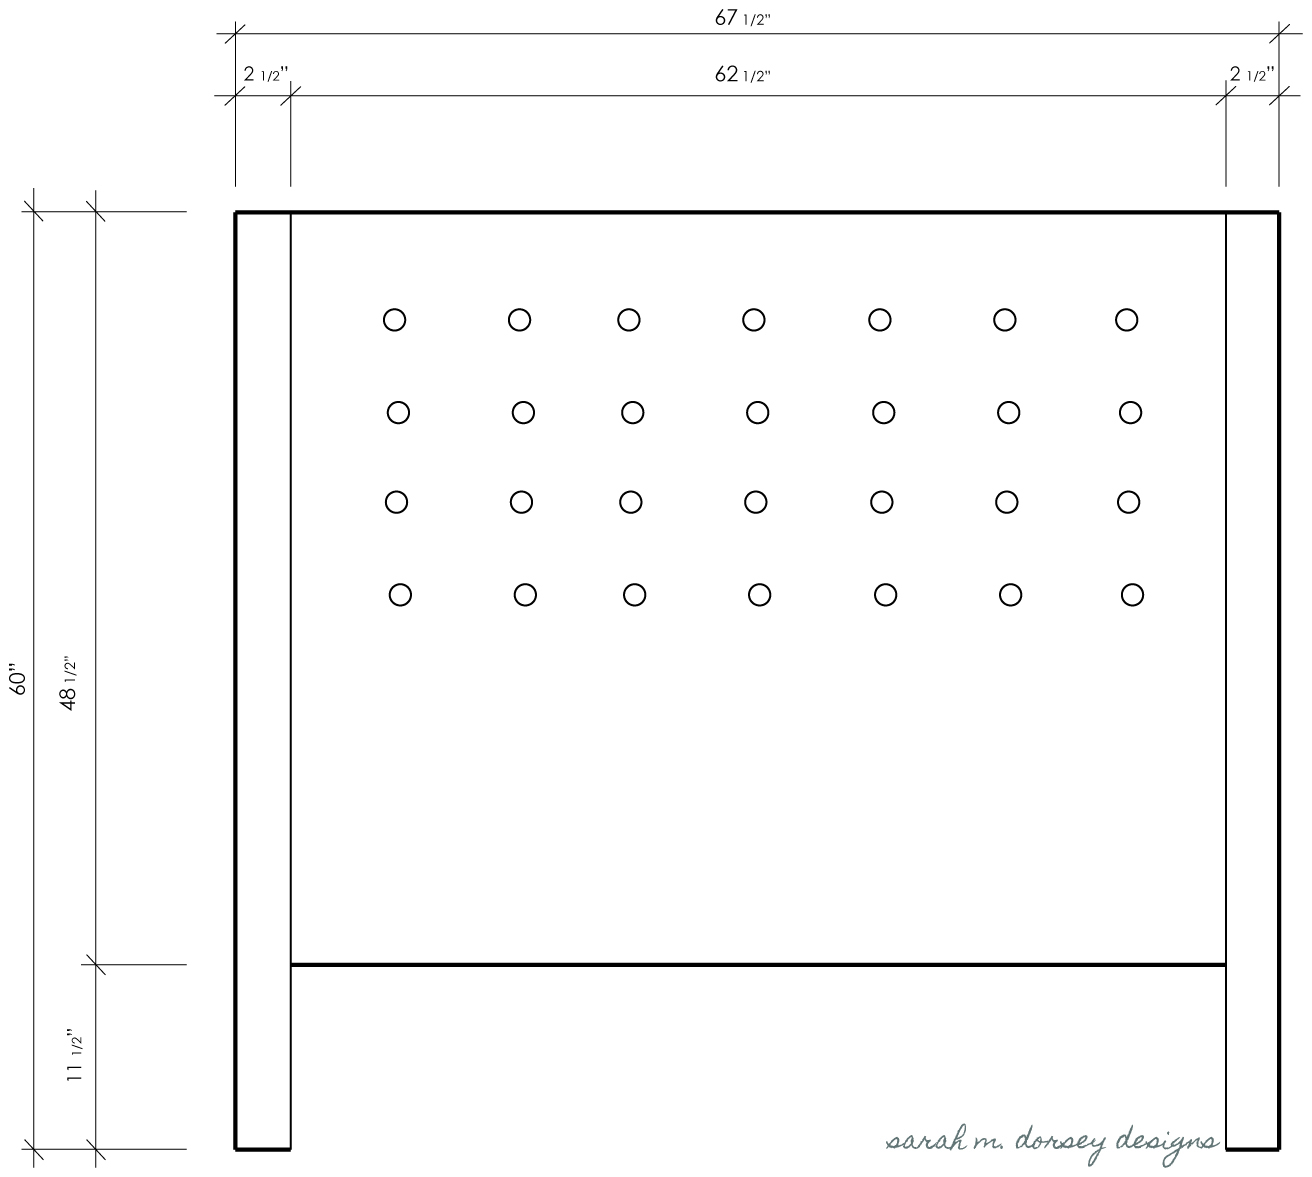
My husband David and I gathered supplies –
– 62 1/2″ x 48 1/2″ plywood (1/2″)
– 1 x 4s, (for back supports)
– 1 x 6s and 2 x 6s (for side arms)
– 4 yards of fabric (what I used is no longer available, but this is similar)
– 28 buttons to be covered
– 62 1/2″ x 48 1/2″ foam (1″)
– Batting to cover front and arms
– Nailhead trim (about 500)
and got to work!
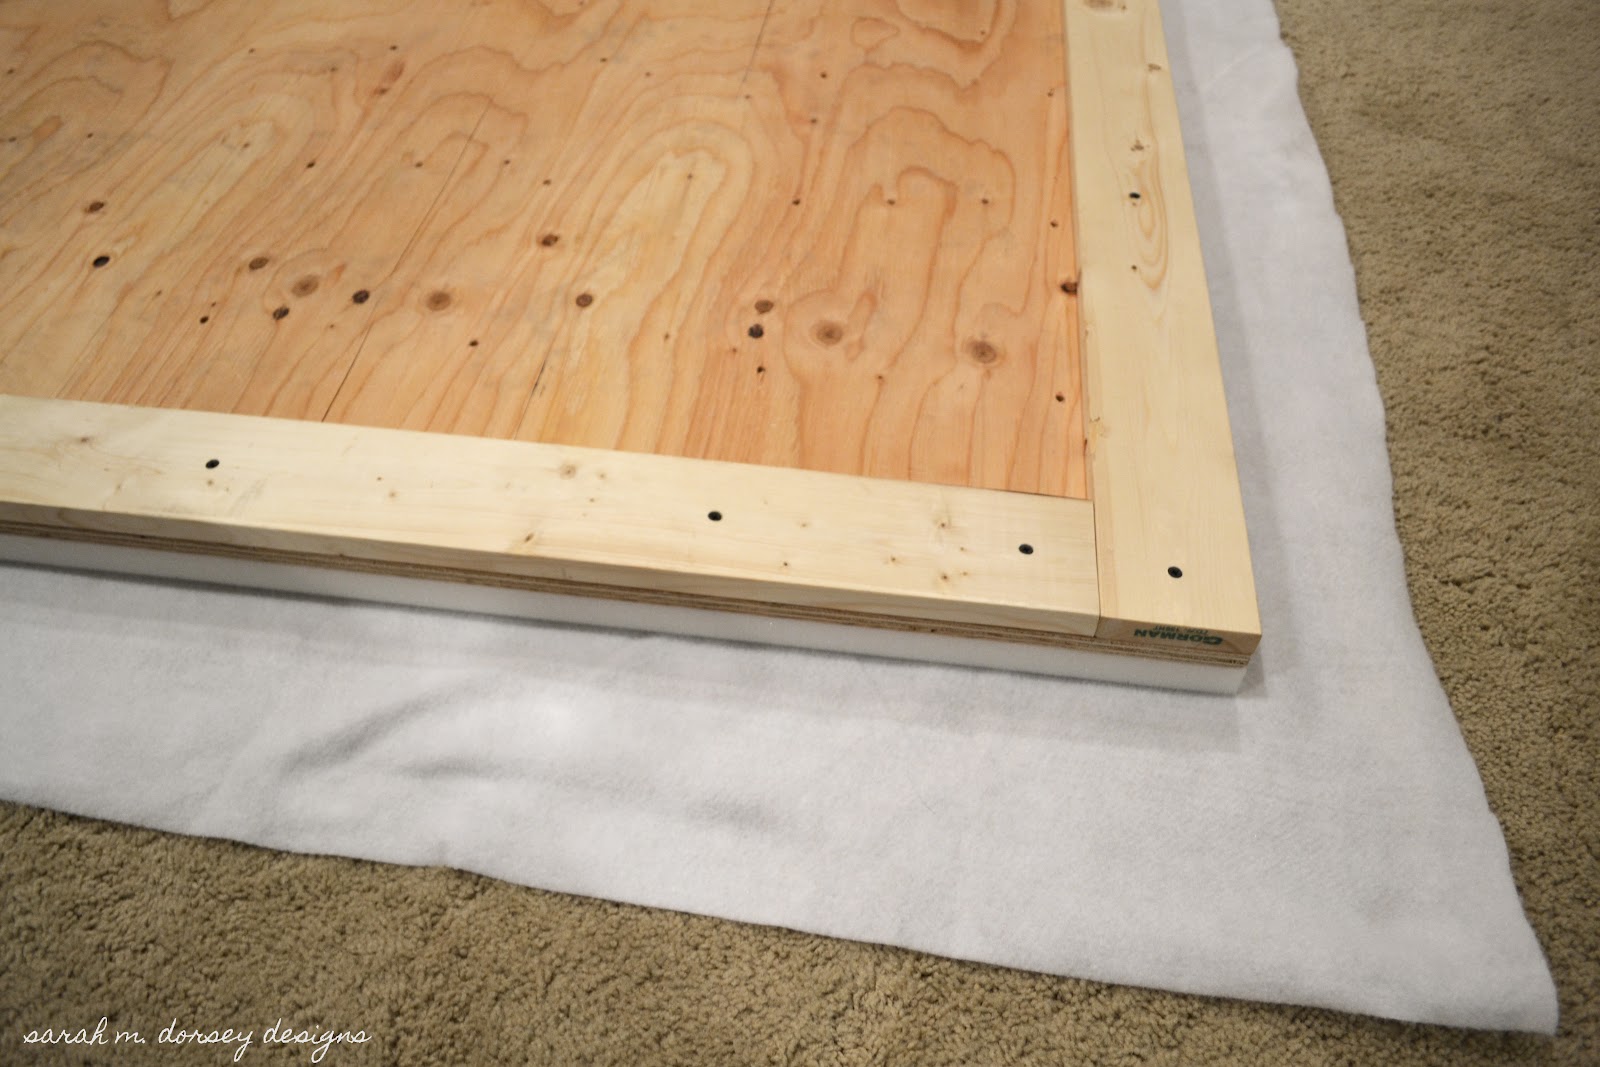
The plywood was cut to size, holes drilled for tufting, 1x4s were cut and screwed into place to build a support around the entire back
Next, 1″ foam was attached with spray adhesive to avoid it slipping while tufting
Batting was attached with staple gun and excess was cut off
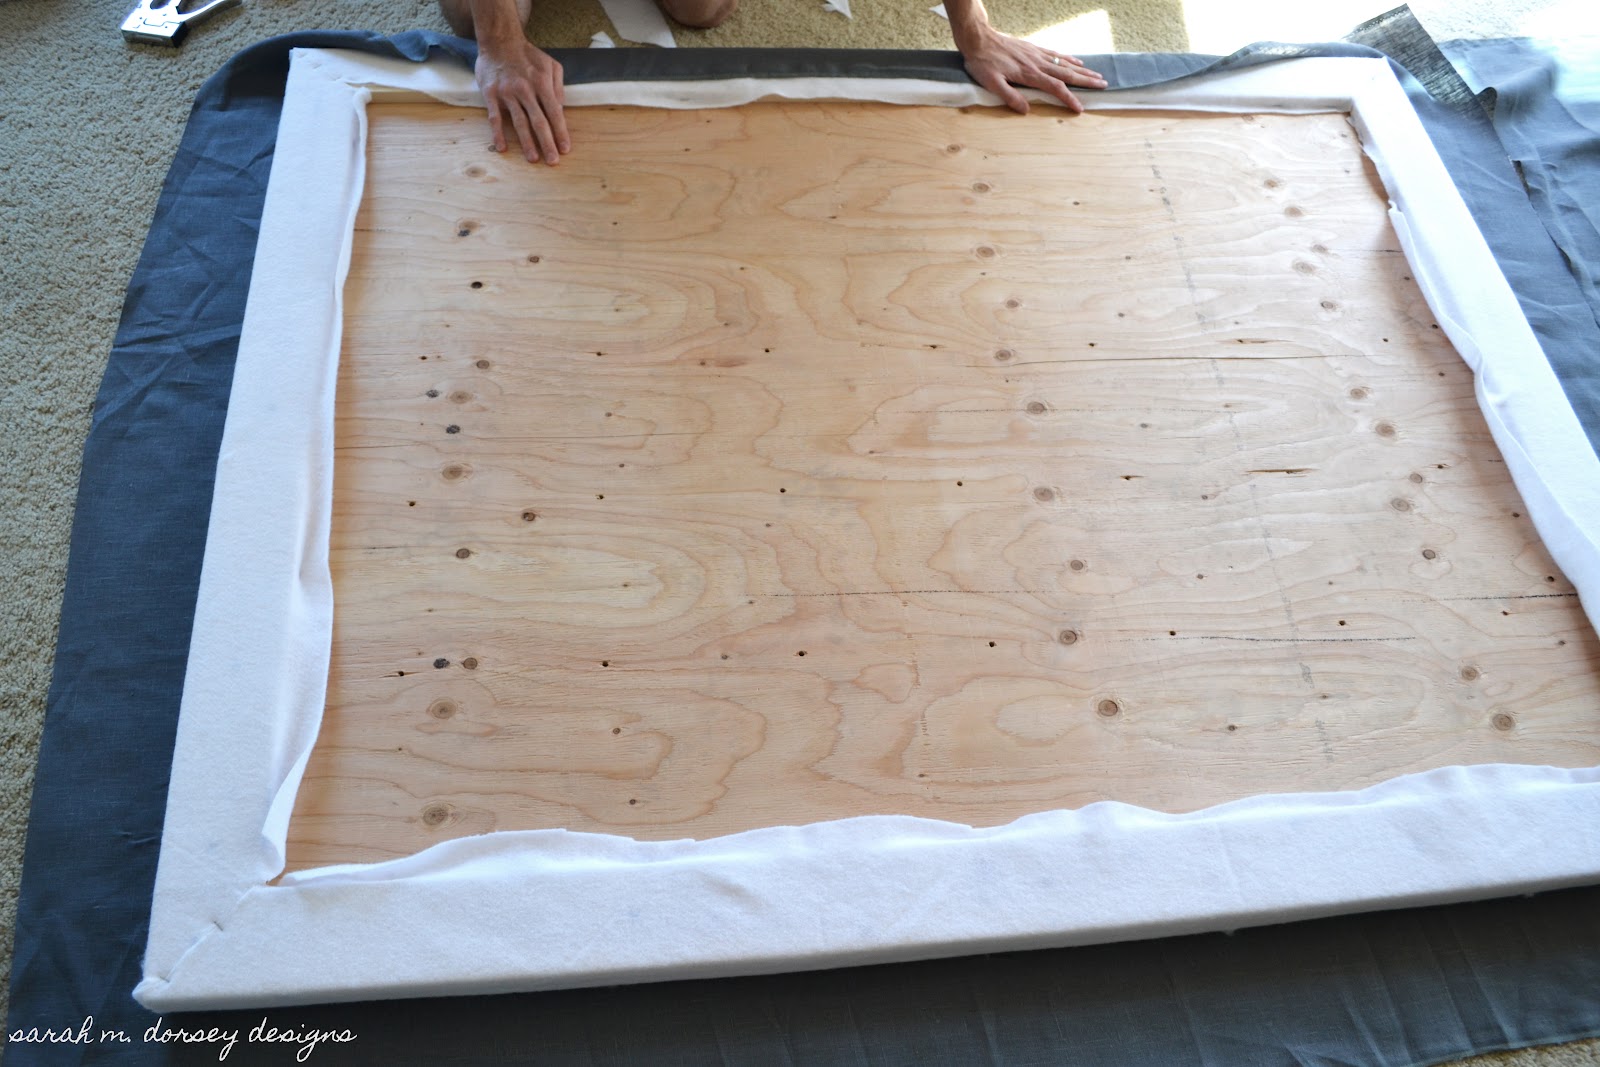
I purchased a button kit at Joann Fabrics. Because I wasn’t buying upholstery buttons, I applied a small amount of glue on the interior of the buttons to prevent them popping off later
Headboard was flipped over (we used two dining chairs for support) fabric was placed on top  – and we began tufting with a long needle and heavy duty thread – starting in the center and working our way out – pulling the fabric tight as we went
I threaded the needle through the hole and pushed the button down –
While David secured the button from below
Then the fabric was stapled on the back – the batting and fabric for the arms were cut and placed between the headboard the arm – the arms were then attached with screws – the remaining fabric was pulled tight and stapled on the back
After the fabric was secured and excess was trimmed off – I began applying the nailhead trim – two rows per arm, floor to top of headboard took about 500 nails
And there you go! We worked on and off for about 2 days and total cost was just under $150
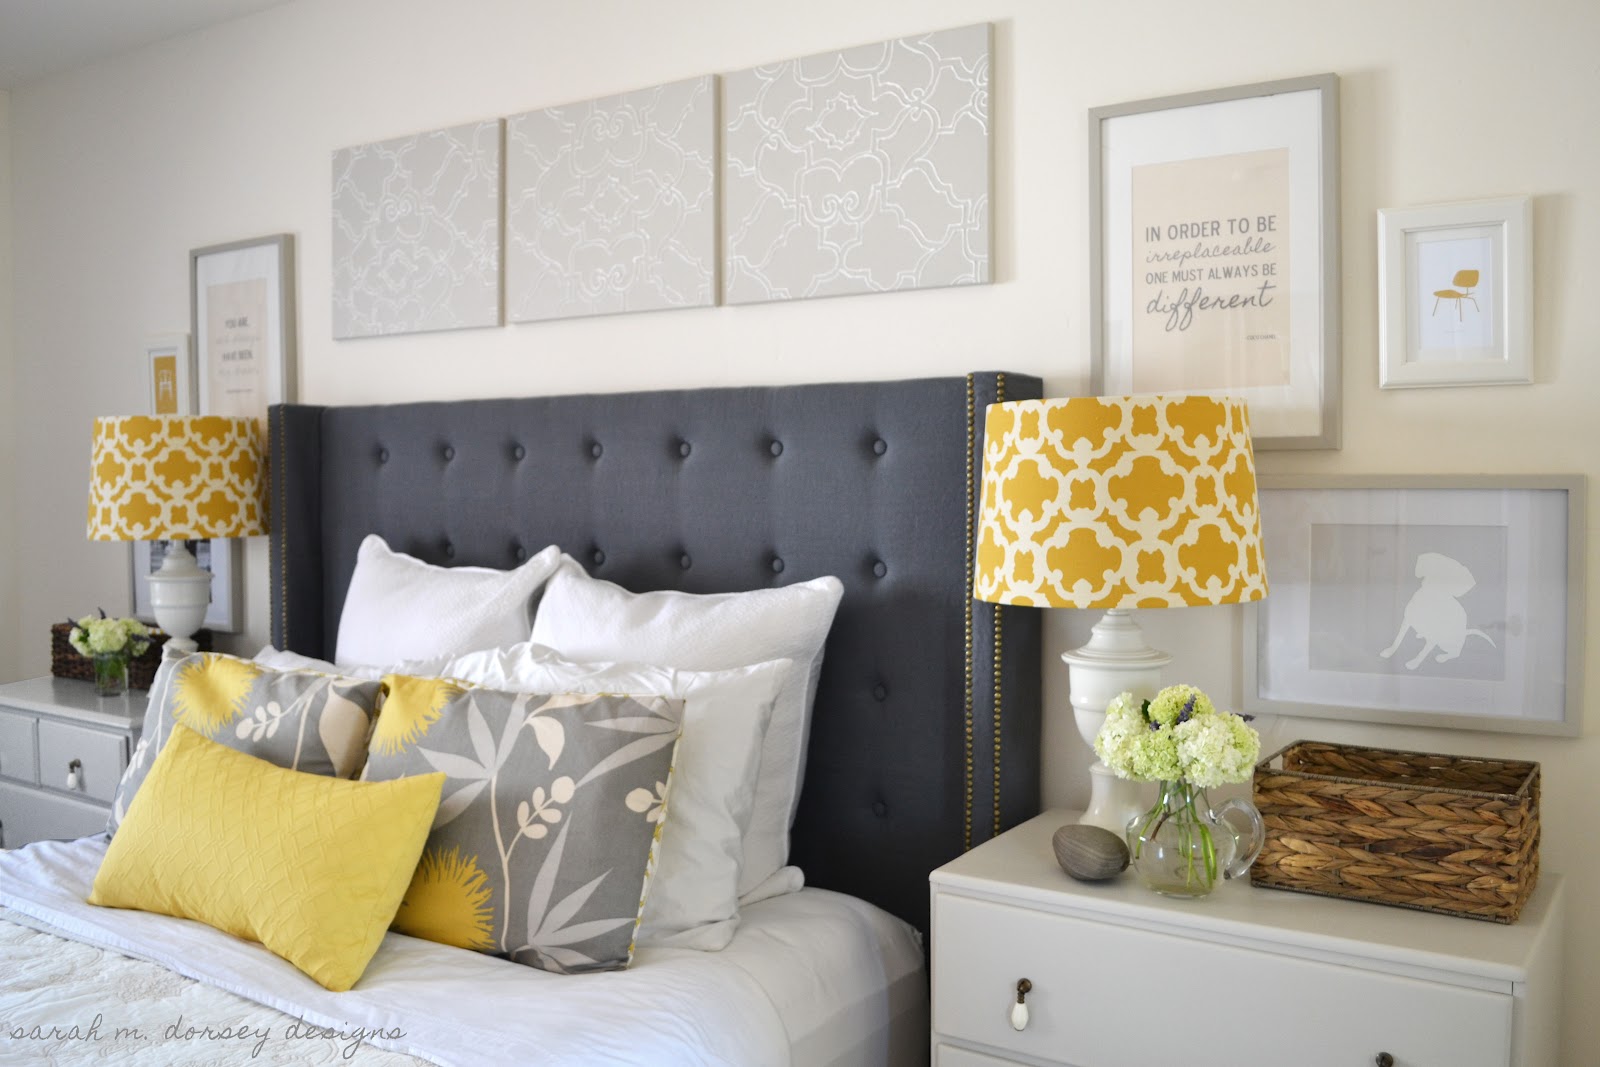
I love how headboards can really transform a space – and for a weekend project that’s under $150 – its definitely worth trying!
Feel free to stop by my blog and say hi sometime, I’d love to hear from you!
Thanks so much for having me Danielle!
Incredible right? I love a DIY that does not look like one, and this headboard is perfect!
Just incase you aren’t convinced of Sarah’s mad DIYing skills, check out a few of these projects:
Thanks so much for being here today Sarah, you are amazing!

Winner, Lonny, & Sunburst Mirror Round-up!

I hope you had a great Mother’s day weekend, I know I did.
I kinda think it should be Mother’s week, anyone with me?!
I am excited to announce the winner of the Elegant Touch giveaway!
Congrats Liz!
I can’t wait to see them in her den!
Also, I had a chance to check out the newest issue of Lonny this weekend.
It is yummy.
I was especially drawn to these three rooms…

{all images via Lonny}
Do you notice anything in common?
Sunburst mirrors!
Yep, they are still in style and going strong! 
I put together a quick round-up of my favorite sunburst mirrors:
1.2.3.4.5.6
These mirrors range from $49.99 – $299.00, pretty reasonable if you ask me.
I think I might need a cluster of them, loving that.
Happy Monday!

Online Bedroom Design Reveal!

Yesterday I had a chance to visit an online design client.
She had won my online design giveaway and happened to be local!
I don’t typically get to visit my online clients, so this was a treat.
The room was for two girls, 10 & 12 years old.
We wanted to create a space that would grow with them, but still be young and playful.
The design evolved a lot from our original plan, but I love the way it turned out. I definitely can’t take all the credit for this space, my client has great style and really ran with it!
Here is the before: 

And the after:
Painting the walls and baseboards transformed the room.
It’s amazing what a little contrast will do.
She made the headboards out of Caitlin Wilson’s Berry Fleur Chinoise fabric.
I think they turned out fantastic.

I also adore those hanging lanterns!
We were originally planning on a fun painted chevron in the reading nook, but the girls wanted to create a custom design including their handprints. 
I love that personal touch.
From what I hear, the hanging bubble chair is the girl’s favorite spot, pretty sure it would be mine too.
I love seeing a design come to life and this one was no exception!

Coco + Kelly Home Tour!

I love seeing home tours that real people live in.
Ok, I know real people live in every home, but sometimes it doesn’t seem like it.
Cassandra’s, from Coco + Kelly, home was recently featured in Rue Magazine and I am in love.
Although her apartment is styled perfectly, it stills feels warm, cozy, and live-able.
A few things I love:
1. The neutral color scheme with pops of color.

2. $7.00 dotted Ikea pillow!
 It seems to work in every space!

3. That her living room, dining room, and office is one big room (welcome to my life!). 
It’s small but so fabulous.

4. She had to swag her chandelier but still made it look great. 
How many of us have this problem?! 
5. The bench seating. 
Doesn’t it gives the illusion of a custom banquette? An awesome idea for a small space.

6. The dresser. 
I love it, I need it.

7. The gold trim on the doors. 
Such a simple detail but adds so much!

{all images from Rue Magazine and Coco + Kelly}

Did you enjoy this home tour as much as I did?
It is pretty awesome.
You can see more from the newest issue of Rue here!