I am so excited to have Sarah from Sarah M. Dorsey Designs here today.
After stumbling across her blog and finding her DIY headboard, I knew I wanted her to share it with you!
Sarah is crazy talented, you will love her!
Hi! I am Sarah and I blog at Sarah M. Dorsey Designs – where I focus on creative design solutions that won’t blow your budget!
First off I want to send a big thank you to Danielle for inviting me to share with you one of my latest projects!

I love the look of a tufted and winged headboard but at $500.00 and up I decided to make my own version for a lot less $$.
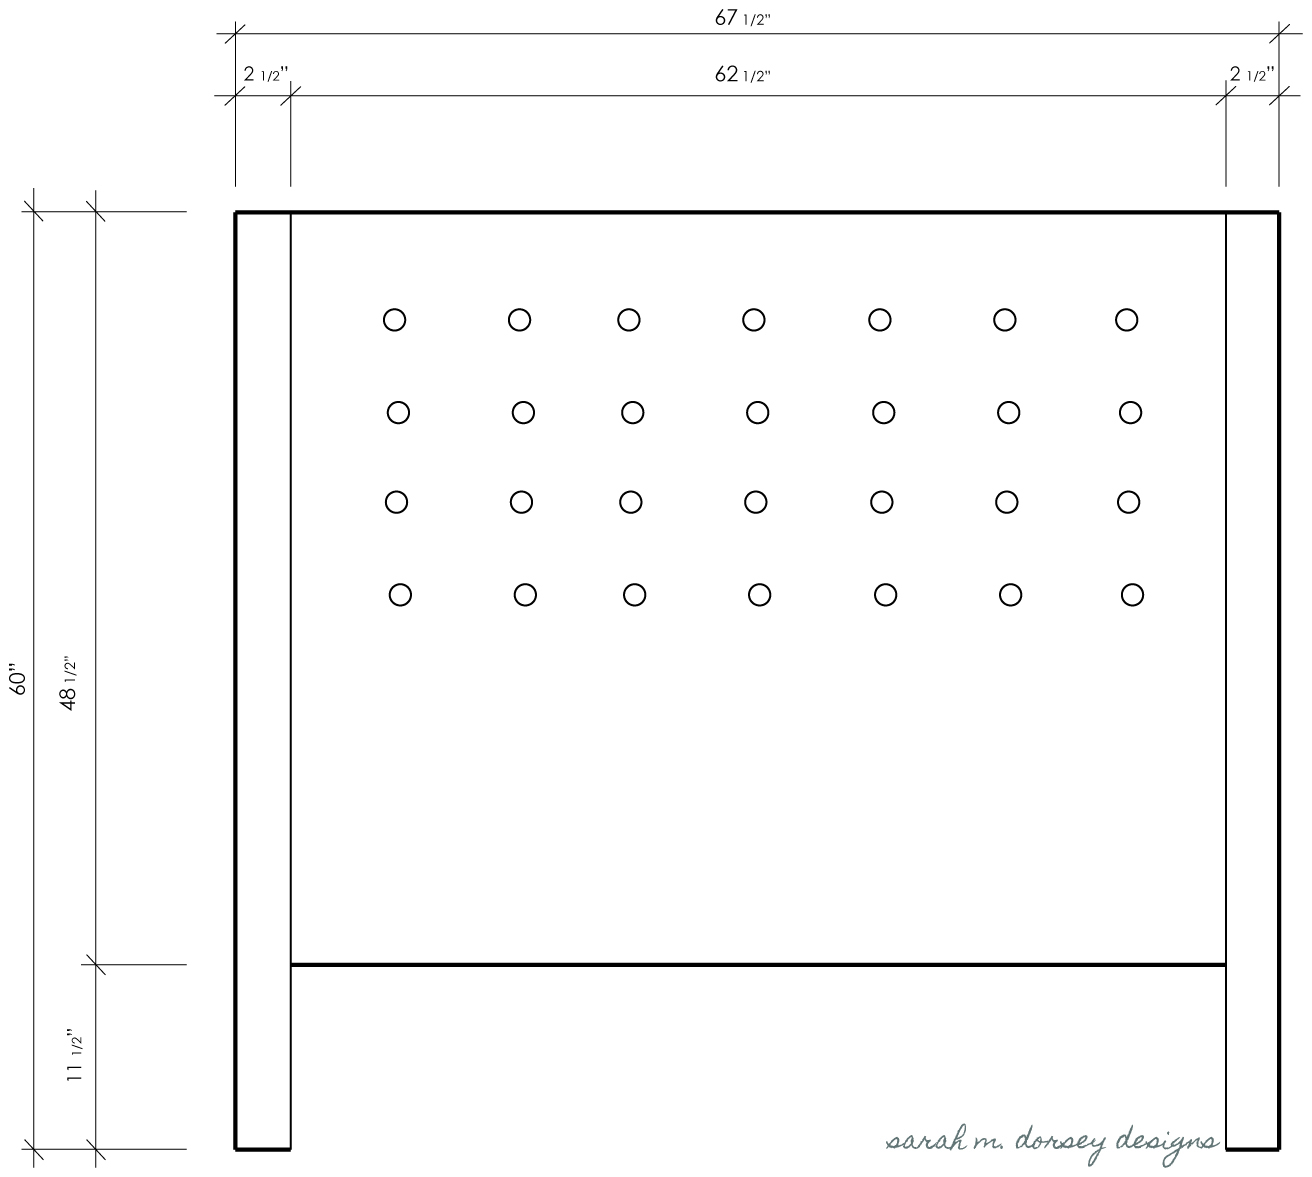
After developing a plan –
My husband David and I gathered supplies –
– 62 1/2″ x 48 1/2″ plywood (1/2″)
– 1 x 4s, (for back supports)
– 1 x 6s and 2 x 6s (for side arms)
– 4 yards of fabric (what I used is no longer available, but this is similar)
– 28 buttons to be covered
– 62 1/2″ x 48 1/2″ foam (1″)
– Batting to cover front and arms
– Nailhead trim (about 500)
and got to work!
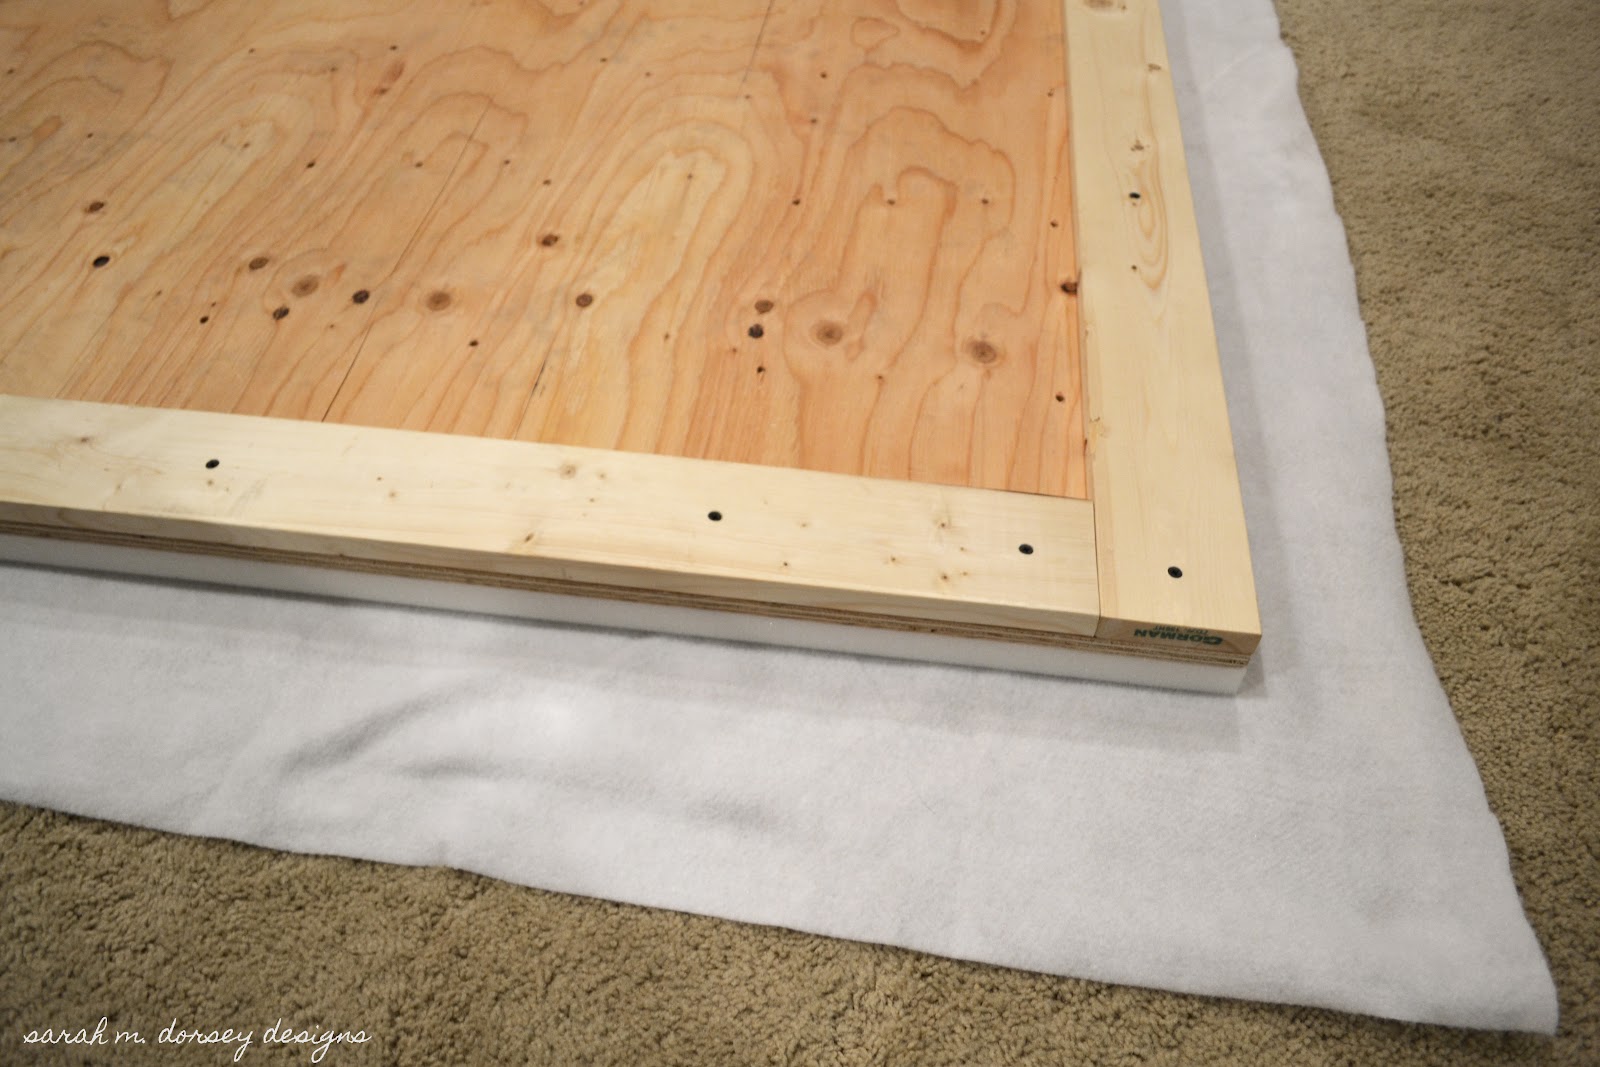
The plywood was cut to size, holes drilled for tufting, 1x4s were cut and screwed into place to build a support around the entire back
Next, 1″ foam was attached with spray adhesive to avoid it slipping while tufting
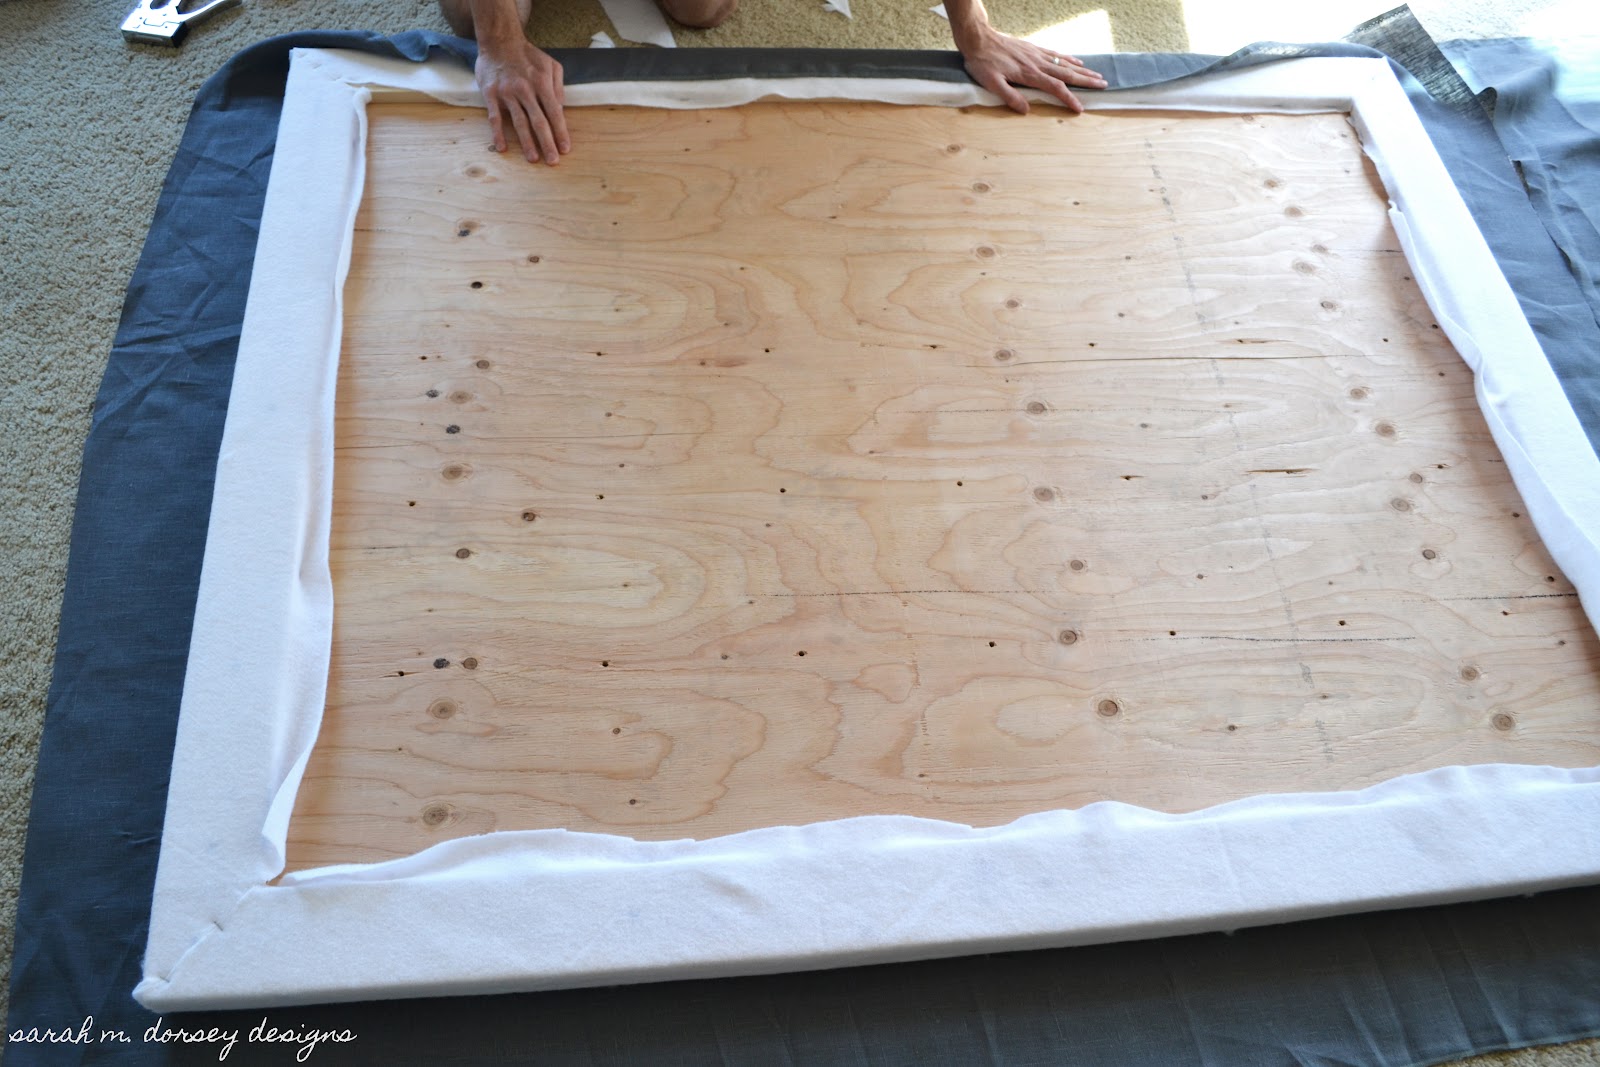
Batting was attached with staple gun and excess was cut off
I purchased a button kit at Joann Fabrics. Because I wasn’t buying upholstery buttons, I applied a small amount of glue on the interior of the buttons to prevent them popping off later
Headboard was flipped over (we used two dining chairs for support) fabric was placed on top – and we began tufting with a long needle and heavy duty thread – starting in the center and working our way out – pulling the fabric tight as we went

I threaded the needle through the hole and pushed the button down –
While David secured the button from below

Then the fabric was stapled on the back – the batting and fabric for the arms were cut and placed between the headboard the arm – the arms were then attached with screws – the remaining fabric was pulled tight and stapled on the back

After the fabric was secured and excess was trimmed off – I began applying the nailhead trim – two rows per arm, floor to top of headboard took about 500 nails

And there you go! We worked on and off for about 2 days and total cost was just under $150
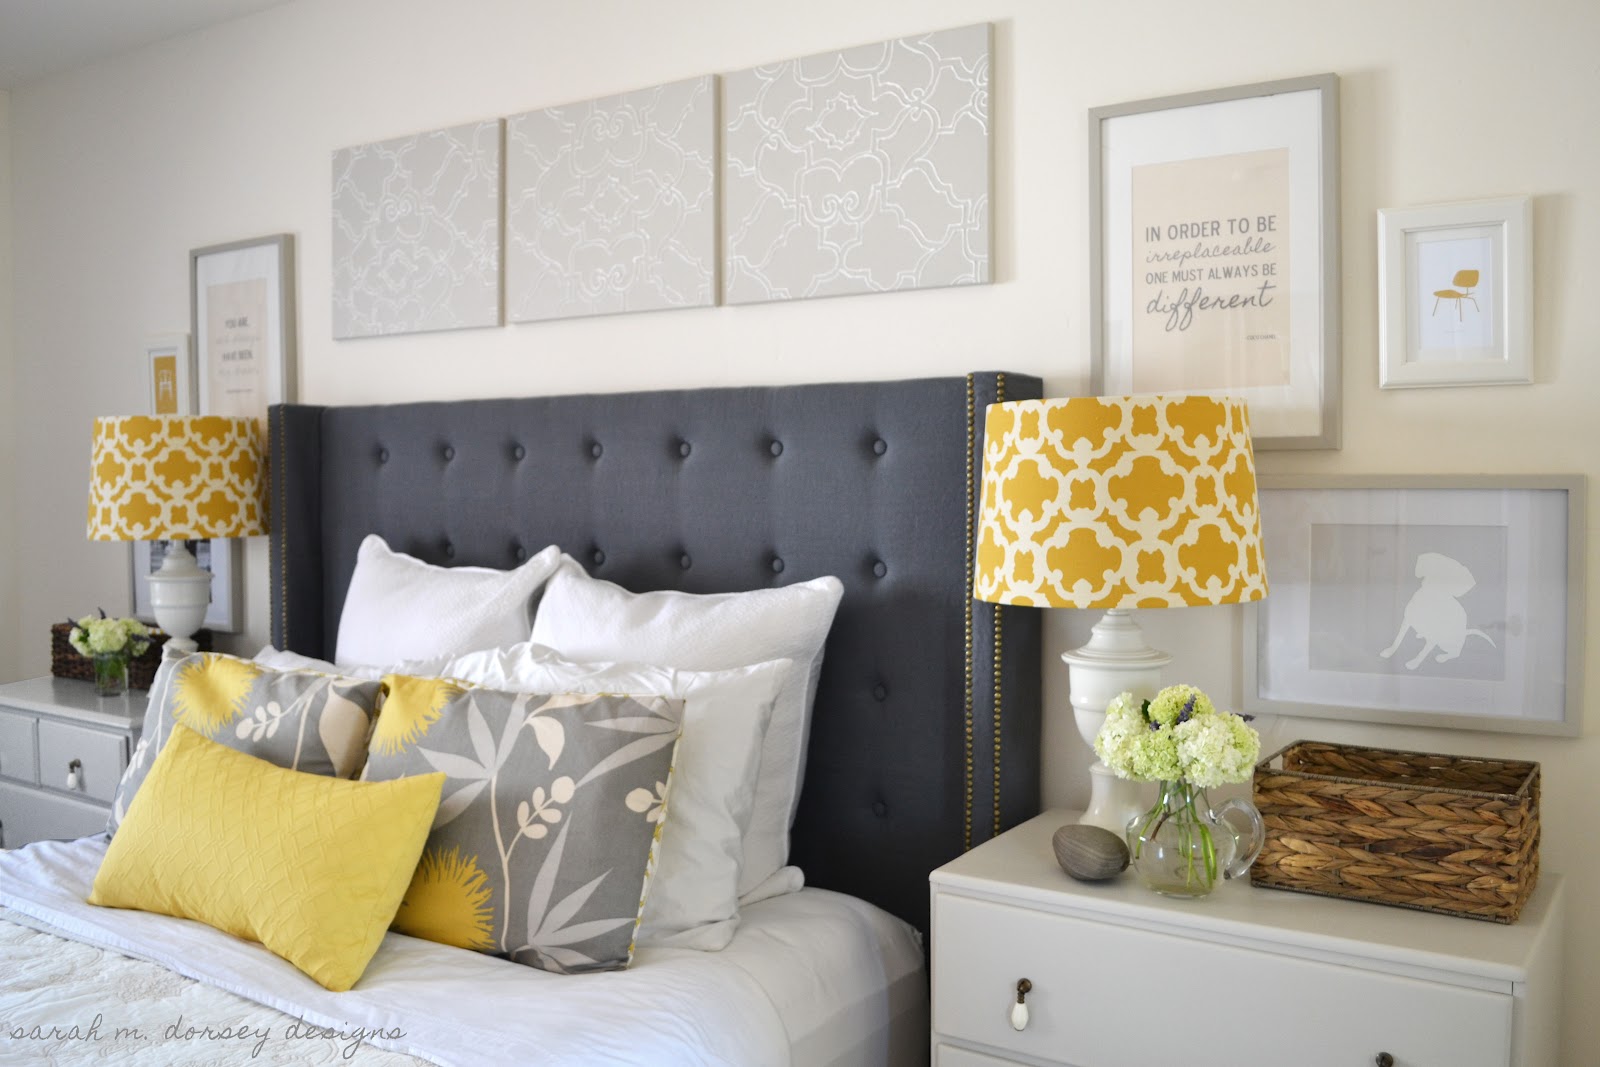


I love how headboards can really transform a space – and for a weekend project that’s under $150 – its definitely worth trying!
Feel free to stop by my blog and say hi sometime, I’d love to hear from you!
Thanks so much for having me Danielle!
Incredible right? I love a DIY that does not look like one, and this headboard is perfect!
Just incase you aren’t convinced of Sarah’s mad DIYing skills, check out a few of these projects:
Thanks so much for being here today Sarah, you are amazing!
Wow, her whole bedroom is gorgeous! Thanks for sharing!
Holy cow. That is gorgeous. I really love the fabric chosen as the bedskirt, too. Quite the talent. Thanks for the introduction!
Fabulous job! SO inspiring! What a amazing job she did on the entire space!
Now that is one AMAZING DIY!!! It looks so professional and gorgeous- well done!!!
Um. Beautiful heavenly tuftedness!!! Where did those nails come from? They aren’t the normal flat ones, but have that lovely design on them. Do tell:)
Thank you Michelle!
Nailhead is from:
http://www.diyupholsterysupply.com/BR1558/upholstery-nail-716.html
This bedroom is amazing! I have the yellow lamp and LOVE it : ) where did you find the 3 pieces of art above the bed? I’m currently looking for something just like that. Awesome job!
this is my “to do” list now; beautifully designed
Gorgeous room and I love how the headboard turned out (I’m loving those side tables too). Thanks for sharing – I love discovering amazing new blogs!
Wow- what a project! I love wing back headboards and this looks amazing! Thanks for sharing. 🙂
Wow that is one awesome DIY!! It looks like it cost about $1500 not $150!
You did such a great job!!! Im so impressed. How did you get your nailheads straight? I made a headboard recently and have been too scared to tackle the nailheads that I had planned on adorning it with because I’ve seen too many that were all zigity zag down the line. Any thoughts?
Thanks Bethany! I think part of the key is getting a higher quality nailhead (I’ve used some from wal mart before that were a lot cheaper and bent easily) These were much stronger! Also, when applying them I get it almost all the way and then tap side to side till it is straight – it is amazing how much play they have! Hope this helps!
Beautiful!!
Her house is so cute!! Thanks for sharing!
Great job–and a beautiful room!
Lovely decor!
I love this headboard! My name is Kathryn Nelson. My husband and I are trying to make a extra wide wingback headboard that would be the width of a full size bed. We are placing the bed long way against the wall. We wanted the bed to look somewhat like a couch. Could you explain in more detail how you upholstered the buttons and how far apart you drilled the button holes? Oh, and I am still a little confused about how you upholstered the arms of the headboard. My e-mail is kanelson80@cox.net
The room is just beautiful!
love!! will you share where your bed skirt is from?
You have to determine how much your budget for your headboard is. This can help you choose what materials to use. You can create one if you do not have much budget.
This comment has been removed by the author.
I would love to know where the bedskirt is from as well.
hi,
This bedroom is amazing! I loved room pics.
Modular Kitchen | MDF with Veneers
Can you please come over and decorate my apt?! You do a fabulous job. My husband and I recently married and we are moving into an apt together. We have no clue what furniture to buy…starting from scratch sucks.
What size bed was this headboard made for? I have a queen so I want to make sure I get the right dimensions!
Hi, My name is Peaches.
I love this headboard best of all. What size bed does it fit? I need to make one
That fits a king bed. What adjustment do I need to make in measurements? is that like a blue jean fabric. What type of fabric do you suggest? I admire your work and that is why I have so many questions. Thanks guys.
It seems to be so easy to make a headboard. Super tutorial.
Your room is great! My daughter wants this headboard and we’ve gathered the materials and we’re ready to go. I wanted to ask how you measured for to drill the holes in the plywood for the tufted effect and buttons. I’ve done buttons in an ottoman but we drilled holes in the foam and there was no wood like on the headboard. Where did the first hole and row start and where does it end? Thanks.
I need to make a full size headboard. How fall apart should the supports be for a full size headboard?
When we made our King Size we measured the bedframe before we decided on the width. Here’s a link that gives the measurements for a full size.
http://askville.amazon.com/measurement-full-size-bed-headboard/AnswerViewer.do?requestId=87756940
Wow, her whole bedroom is gorgeous! Thanks … couchbedpink.blogspot.com