DIY Spotted Tablecloth Tutorial!

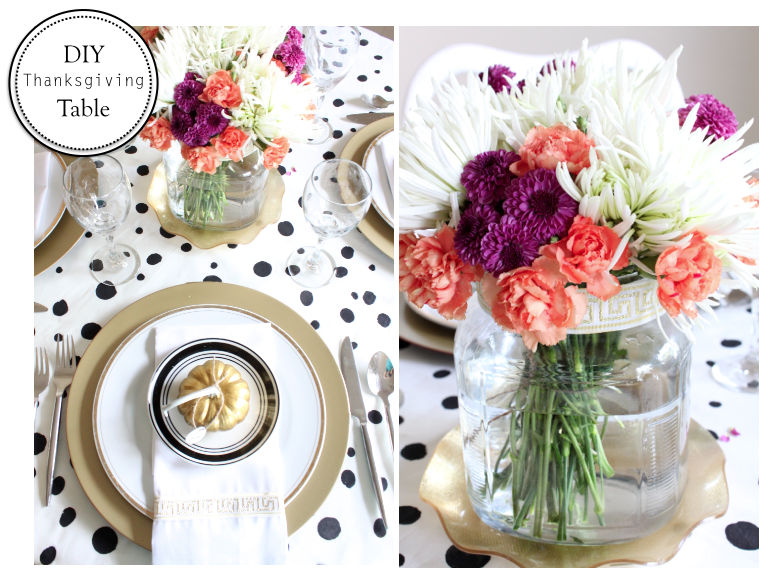
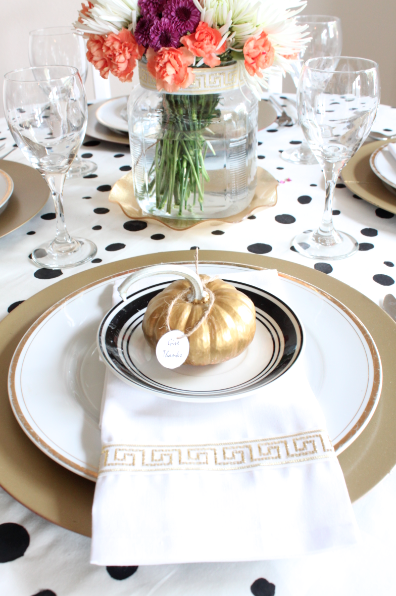
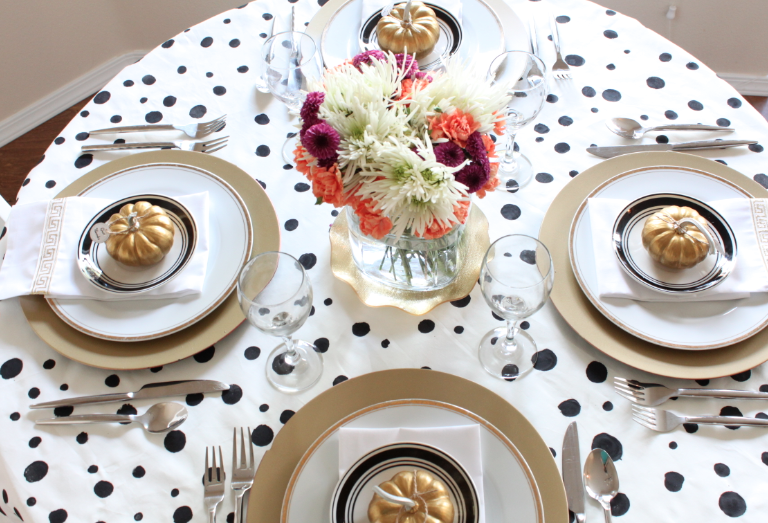
In case you missed my post yesterday, I shared my DIY Thrifty Thanksgiving Table.
In my opinion, the DIY spotted tablecloth stole the show!
As promised,  today I am going to share the tutorial with you.
It’s not much of a tutorial because it is SO easy, but this is what I did:
Supplies:

+ White Fabric (I purchased mine from Home Fabrics for $3.99/yard and needed 1.5 yards)
+ Black Paint (I probably should have used fabric paint, but I had black acrylic paint on hand and it worked great. So far it has held up to ironing, although I haven’t washed it yet. I’ll let you know how that goes after the Holidays).
Tutorial:
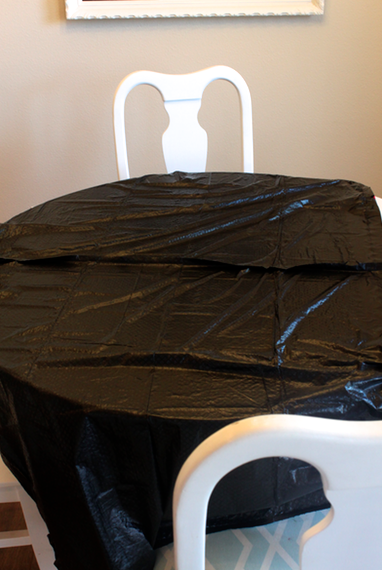
1. Cover your table in plastic (I used big black garbage bags). When you apply the paint onto the fabric, it will bleed through the back (unless you use a really thick fabric), so it’s a good idea to protect the table with plastic.
2. Place your fabric on the table.
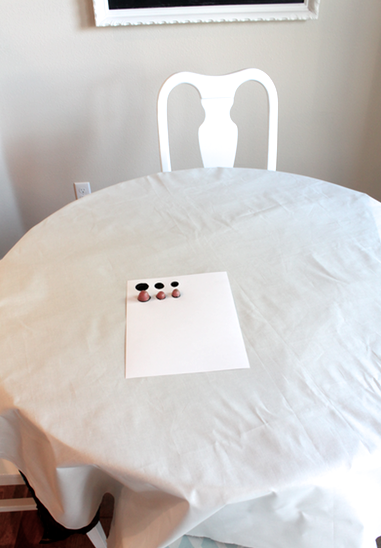
3. I cut 3 red potatoes in half to create stamps. One large, one medium, and one small. I like how the potatoes are not perfectly round, a look I wanted to achieve. I then dipped the potato in the black paint and stamped it on the tablecloth. 
I didn’t follow any pattern, just randomly stamped all over.
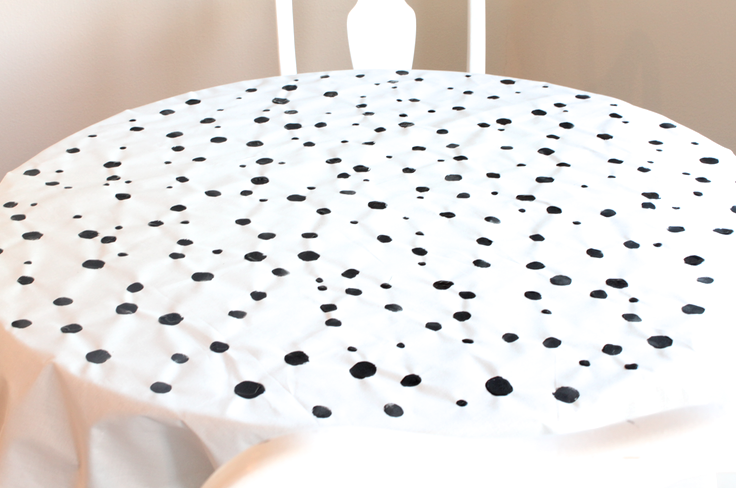
4. I then took the end of my paintbrush, dipped it in the paint, and stamped on the smallest dots.
I also used the back of the paintbrush to fix any mistakes I made with the potato stamps.
5. I then let it dry and then continued the steps on the remainder of the tablecloth.
See, told you it was easy!
Also, you can see all the details on my DIY Thrifty Thanksgiving Table here.
What do you think, ready to give it a try?
xo,


My Thrifty DIY Thanksgiving Table!

A couple weeks ago I challenged myself to create my Thanksgiving table for $25.00.
This year will be my first time hosting Thanksgiving and I can’t help but focus on making it beautiful. Since we have been students for the last 8 years (and have moved 6 times), we are lacking in the tableware department.
I love to thrift, DIY, and decorate, so naturally creating a Thanksgiving table from thrift store finds and DIY projects just made sense.
My original budget was $25.00 which I quickly learned was a little too tight. Although I did purchase all the essential items for $22.54 (plates, chargers, glasses, tablecloth, napkins), all the little details tipped me over.
Here is the breakdown:
Dinner Plates (Thrift Store): $.99 x 4 = $4.00
Salad Plate (Thrift Store): $.35 x 4 = $1.40
Glasses (Thrift Store): $.99 x 4 = $4.00
Chargers (Tai Pan Trading Clearance): $.50 x 4 = $2.00
Table Cloth (Home Fabrics): $3.99/yard x 1.5 yards = $6.00
Pumpkins (Grocery Store): $.99 x 4 = $4.00
Napkins (Walmart): $1.97 x 2 = $3.94
Greek Key Trim (Walmart): $.77/yard x 2 yards = $1.54
Glass Jar (Walmart): $4.00

Total: $30.08

I also splurged $8.00 on flowers from Fred Meyer’s which makes my grand total was $38.88
All of the dishes were purchased at thrift stores. They came with imperfections (scratches) but you can’t beat the price. I quickly fell in love with the gold detail on the dinner plates and the black and white stripes on the salad plates.
The selection of dishes at the thrift stores was plentiful. I guarantee you can find just what you need after visiting a couple of stores.
  I found the chargers from Tai Pan Trading on clearance got $.50 each. They were a bright red so I spray painted them gold with some paint I already owned.
I purchased the napkins form Walmart for $1.94 for a pack for two. I could have easily made these and saved some money, but buying them was worth my sanity. 
I also purchased the greek key trim for $.77/yard at Walmart. 2 yards is all I needed to add a little detail to the napkins and the vase. I simply sewed the trim onto the napkins.

I also bought the glass jar (vase) at Walmart for $4.00! 
It comes with a cute little lid, so I am sure I will find plenty of use for it after the holidays.
I painted the mini pumpkins a metallic gold. I love how they turned out.
I simply printed out and added a Give Thanks tag to the top of each pumpkin and attached it with some jute twine I had laying around. I think it’s the little details that make the difference.
I purchased the white fabric for the tablecloth from Home fabrics for $3.99/yard and painted on the black spots. I really love how much personality the black spotted tablecloth adds.
I used potato stamps to apply the black paint to the fabric as well as free handed a few.
I will share the tutorial with all the details tomorrow.
As you can see not all the dots are perfect or identical, but I think it adds to the charm of it.
I have to say, I had a ton of fun creating this thirty DIY Thanksgiving table. 
I can’t wait to use it.
Even though I broke my budget, I am still think it’s a steal! Plus, the flowers were so worth it.
Do you have plans for your table yet?
Are you going to do a little thrifting too?
xo,

Society Social LOVE!

Although I typically share affordable options for furniture & accessories, I also have a real big soft spot for well designed pieces.
If you are not familiar with Society Social, then you need to be. 
Each piece is unique and the color options are stunning.
The prices are higher than my typical finds, but they are still reasonable.
Plus, splurging on one statement piece can really elevate a rooms overall look.
Since I am such a lover of color, it is not surprising that I love every single piece.


The pillow selection is pretty dreamy too!


Are you drooling over everything in this shop too?
Now I just need to win the lottery…
xo,

$800.00 DIY Kitchen Renovation!


I am so excited to share this kitchen makeover with you today!
My friend, and talented Interior Designer, Lee recently renovated her kitchen for $800.00.
After receiving a $3500 quote to reface the cabinets, they decided to tackle the job themselves.
The painted the cabinets, changed the counter-tops, updated the hardware, removed a couple cabinet doors, and added a backsplash.

The kitchen was clean and functional but lacked personality.

The after is oh-so-good. 
A little paint (and elbow grease) can sure go a long way.
I adore the blue base cabinets paired with the brass hardware. So so good.
I love how she removed a couple cabinet doors to create open shelving. It breaks up the heaviness and adds some much needed personality.
The countertops were the biggest splurge ($600.00) but the impact was well worth the money. She painted the cabinets and installed the subway tile backsplash herself! 
In my opinion you can never go wrong with white subway tile and grey grout.
Love it.
Lee was kind enough to share all her sources with us, now we can get this look too!
Is that really the same kitchen? 
I want to move in.
Thanks for sharing Lee, you are so talented!
Are you inspired too?
 xo,