Best Sales This Week!

No matter what time of year it is, you can always find affordable furniture and accessories.
Since I spend lots of time sourcing items for e-design clients, I am usually aware of what is on sale.
Here are a few of my favorite affordable items this week…
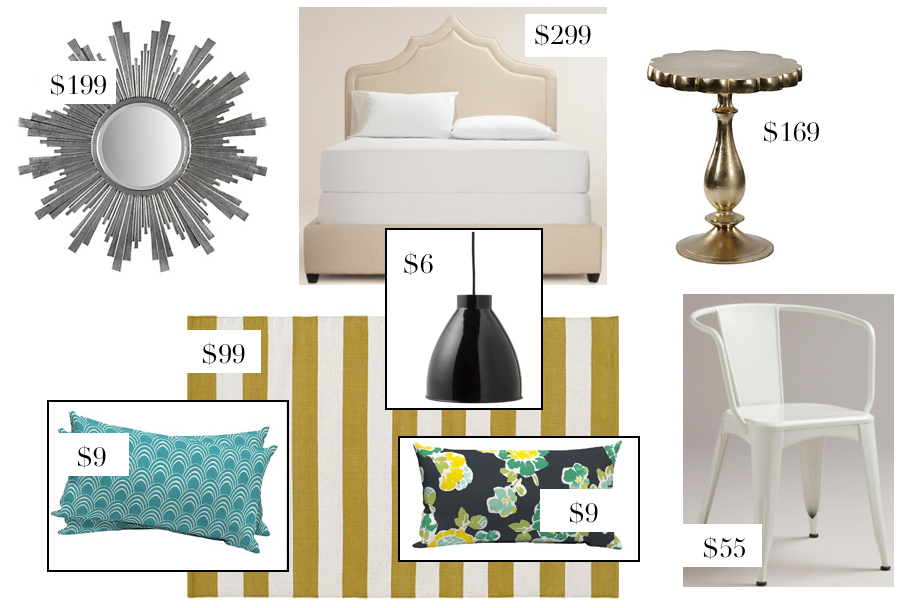
  • Z Gallerie is selling this 48″ Soleil Mirror for $199.00. It’s rare to find such a large mirror for such a great price.
  • You can also grab this Francois Table from Z Gallerie for $169.00. I love the scalloped top.
  • $6.00 for this small black Industrial Pendant from West Elm. That is practically free, I spend more on my lunch most days!
  • Target has some great outdoor lumbar pillows. You can get this cute Tossed Floral lumbar this Scalloped Lumbar for only $9.99!
  • $99.00 for a 5’x8′ Olin Gold Rug from Crate and Barrel is a steal. I love the color and you can’t go wrong with stripes!
  • I wish I had an space this World Market White Metal Tub Chair for only $55.00. I love them used indoors and outdoors.

My top pick has to be this Ninda Upholstered Queen Bed from World Market.
$299 for an upholstered bed? What a steal.
It is currently on backorder, but I would say it is worth the wait!
If you are in the market for a bed, or have an empty guest room, I would jump on this deal!
I sure love a good sale, don’t you?!

Thrifty Tuesday: Inexpensive Spring Updates To My Living Room!

Even though we will be moving in a few months, I wanted to add a few inexpensive accessories to welcome Spring!
As soon as the weather starts to warm up, I get the urge to freshen up my house!
To do so, I simply added a few pink, white, and purple accessories.
The purple silk orchid came from Home Goods for $14.99.
I am impressed with how real it looks, and I love that it pops the purple in my Lona de Anna print.
I also decided to add a little color to my coffee tables.
Since we are selling our condo, I have filled my vases with fresh flowers.
Although I would love to do this year round, it is just not realistic for my everyday budget.
I bought the little white vase from Walmart for $4.00, and the white ceramic flower from Target for $3.99!

I found the pink ceramic candle from Home Goods for $7.99. I love the pattern and it smells amazing too!
Lastly I added covered one of my not-so-pretty books in coral cardstock. So simple and easy.
Even though all the changes were small, when put together they made a big impact!
It’s kind of funny, I finally feel like my living room is finished and of course we are getting ready to move! It always works that way doesn’t it?!

Also, I get lots of emails asking me where my yellow television stand is from. If you are reading this post and wondering, it is from Ikea. Unfortunately they don’t sell it anymore…but they should because it is my absolute favorite piece of furniture ever!
Have you been bitten by the spring decorating bug yet?

DIY Spring Wreath!


I am excited to introduce you Lexie from Carpe Diem!
Lexie has a great eye for interior design and loves a good DIY!

Her DIY antlers are definitely on my to-do list!
Today she is sharing with us her DIY Spring Wreath.
I love love love tulips, so this project was right up my alley!
Take it away Lexie!
*****************************


Spring is finally here and the days are slowly warming up, so I have a fun DIY to share with you to help with your Spring decorating!


Here’s what you’ll need:
ONE// Grapevine Wreath 

TWO// Assorted Moss

THREE// 8-9 Single Stem Silk Tulips

(this project is easier and looks much nicer if you use individual stems that have an inner wire, rather than the large multi stem bunches of tulips) 

FOUR// Large Stem of Greenery

FIVE// 1 yrd. Ribbon

SIX// Small Nest with Eggs

SEVEN// Scissors

EIGHT// Wire Cutters or Needle Nose Pliers

NINE// Hot Glue Gun & Extra Glue Sticks

Start by cutting apart the large stem of greenery into small pieces using your wire cutters. 
Weave the small pieces into the wreath form in a clockwise direction, so it is all curving around the wreath in the same direction. You can hot glue each piece in, but mine stayed in place really well just by weaving them in good (you may want to hot glue if it’s going on an outside door where the wind may get to it) 

Next, cut down your tulips using your wire cutters to desired length. Mine were really long to begin with so I cut 3-4 inches off. 
Using the same method as the greenery, glue in your tulips, overlapping them to hide the glue. It helps if you weave the stems into the wreath a little like you did the greenery. You may also have to glue down the head of each flower where you want it to stay put. 

Be sure to give your tulips a good bend before you glue them in so that they curve with your wreath. 

Also make sure to use the leaves of your tulips to your advantage. They give it a fuller look and cover up the not so pretty part underneath, so don’t remove them! 

** I hung my wreath on the door of my craft room with a metal door hanger, where I could reach it with the hot glue gun, so that I could have a better view of it as I finished gluing things in. It really does give you a better idea of how it will lay and where you need extra glue to keep things in place. 

Finally, take a little moss and glue it on the bottom inside curve of your wreath, where the nest will sit. Then glue in your nest and hang with ribbon! 

Enjoy! 
To check out more DIYs and design tips, check out my blog. 

******************************

Thanks so much Lexie!
Make sure you head on over to Carpe Diem and say hello, I know she would love it!

Last Minute Easter Table Setting!

Yesterday I got a text from my Mom with a picture of her table setting for Easter dinner.
It was adorable and inspired me to get moving!
I am not one to go all-out for holidays, but a simple table setting seemed fitting.
When I say simple, I mean simple. 
Pink Tulips from Coscto, placemats and name tags made from wrapping paper, and napkins folded to look like bunnies!

I followed this tutorial from Best Bites for the bunny napkins.
Super easy and Emory loves them!
The wrapping paper placemats were so easy and free!
I simply cut out a rectangle and added a scalloped edge. Since they are paper, I plan on letting Emory write on them during dinner. Kinda a fun little activity for a special occasion!
I still need to write names on the heart name tags, but other than that I am keeping it low-key!
Oh, and I need to plan the meal…the hard part for me!
Any suggestions?