this is possibly the easiest diy project i have ever done.
it went smoothly and turned out just as i was hoping.
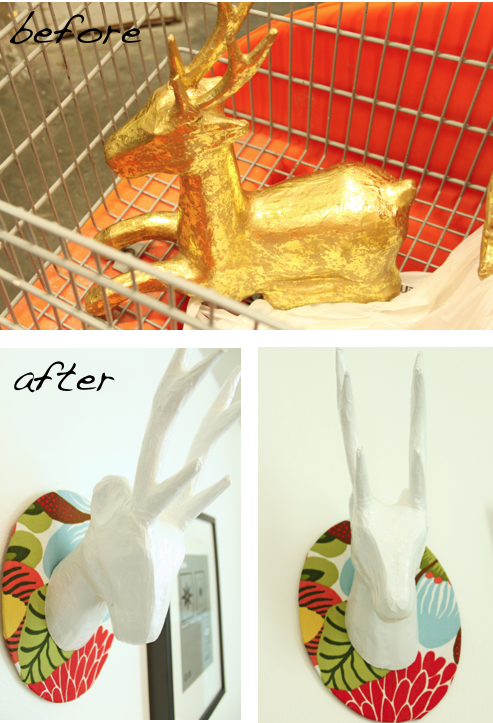
i purchased 2 sitting deer at micheals.
they were on clearance for $8.99 each.

step 1:
cut off heads.
i took the deer to my local home depot’s tool rental.
they used the chop saw to remove the heads.
{hint: you need to cut the heads at the same angle that you want them to hang on the wall}
step 2:
wipe the heads down of any dirt or dust to prep for painting.
step 3:
paint the deer heads.
i used a white primer and a high gloss pure white paint.
it took me 4 coats total.

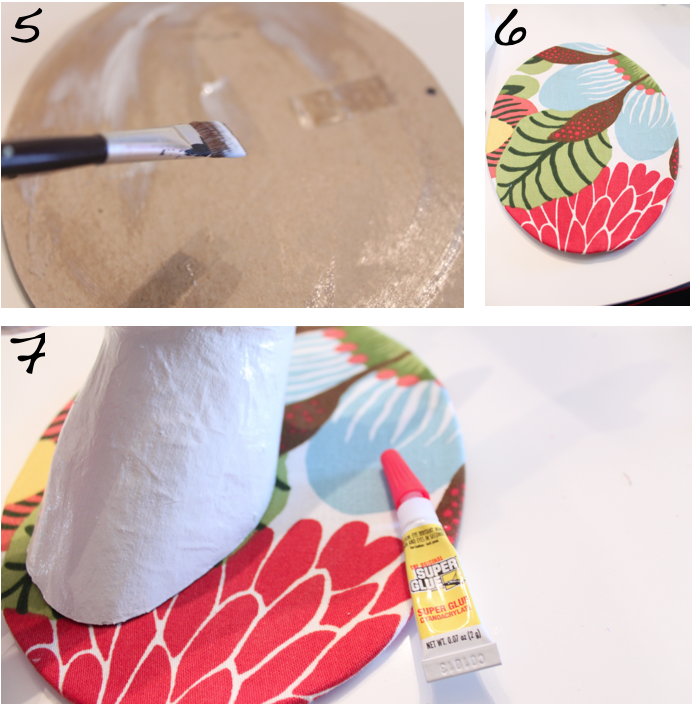
step 4:
select fabric and cut to fit your plaque.
i used a leftover backing from an old picture frame as my plaque.

step 5:
glue fabric to backing.
i used mod podge and it worked perfectly.
step 6:
wrap fabric tightly around plaque
step 7:
glue deer head to fabric plaque.
i used super glue. i am an a super glue kick!
step 8:
attach hook on back.
i used a leftover hook from an ikea picture i purchased. it works perfect.
i used a hot glue gun to adhere it to the plaque.

and your finished.
inexpensive, simple, and quick.
that’s my kind of diy project.
Wow – I was just reading your previous posts, I can’t believe how easy that was. I love the fabric you chose for your mounting boards too. Very inventive!
Cartwheel…I LOVE this idea and am kicking myself for getting rid of 2 of these last year.
-Rene
I know I have been going crazy over this DIY, but I will give you one more – WELL DONE and I LOVE IT!
Love this DIY. Your creativity blows me away!
Love it! I will now be in search of some deers to decapitate! Good job Danielle!
Thanks so much for sharing…great idea! If you’re interested, I am doing a giveaway of my own handmade pottery today…check it out if you want! 🙂
What a clever idea! I never think of stuff like that. I love it!
I love it! Thanks for the tutorial!
Oh my gosh!!! this looks SO GOOD!! I had to laugh out loud when you said Step 1: Cut off head. Man these are so pretty…. I think I already said that. Have you been to Nordstroms lately? At least the one here in Richmond has white deer heads decorating the whole department store. So pretty – and so crafty!
This comment has been removed by the author.
Ok i’m a goofball. I got excited and replaced my signature with the last thing i copied and pasted, which was your blog! haha
anywho – thanks for finding me! I can’t wait to read more of your blog!
xoXOxo
Jenn @ Peas & Crayons
You made me laugh. I just took the deer home and cut off their heads.. You did a wonderful job, the deer look great. Fantastic diy.
Amy R.
Great job. My stomach hurts from laughing about the Home Depot guy.
Funny.
Teresa
Wow, they look fantastic! I really love the fabric you used for the back. Thank you for stopping by my blog and your lovely comment! Rachel xx
I LOVE those!!! I think I need to find a space to make my own!
happy weekend, danielle!
that is completely fantastic! If I see any of those on sale, I’m bringing them home and trying it – very clever.
Well Done! Now you can add taxidermist to your growing list of talents!
Fantastic post and perfect timing on being able to find the deer heads! Loved it. M.
http://www.interiordesignmusings.blogspot.com
this is awesome!!!!!!! what a fab idea! about to become your newest follower- i love everything i have seen so far! 🙂
absolutely love this!! definitely need to try this now 🙂
Just saw your project on Little Green Notebook–what a brilliant idea! So cool!
in love with this idea! so clever, so fun, so many possible variations. well done!
http://portlandsunshine.blogspot.com/2010/12/busted.html
I love this project! Do you know the name of the fabric that you used? I’d love to get some for myself.